Azure AD offers the ability to ensure that users are accessing Azure resources from devices that meet corporate security and compliance standards. Device management is the foundation of device-based conditional access, where you can ensure that access to the resources in your environment is only possible from managed devices.
Device settings can be managed from the Azure portal. To manage your device settings, your device needs to be registered or joined to Azure AD.
To manage the device settings from the Azure portal, you have to perform the following
steps:
- Navigate to the Azure portal by opening https://portal.azure.com.
- In the left-hand menu, select Azure Active Directory.
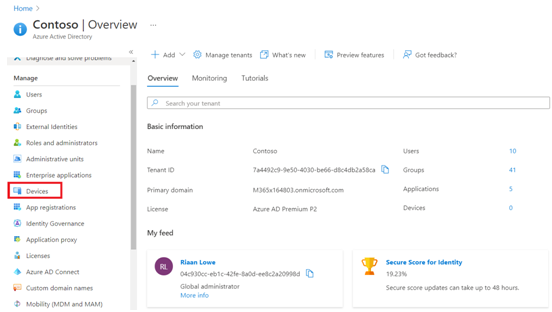
- In the Azure AD Overview blade, under Manage, select Devices, as follows:

Figure 1.14 – The Azure AD Devices blade
The device management blade will open. Here, you can configure your device management settings, locate your devices, perform device management tasks, and review the device management-related audit logs.
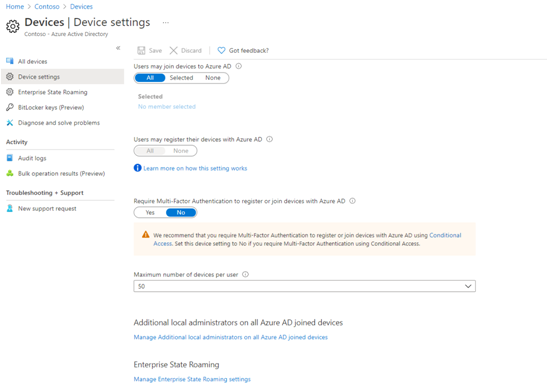
- To configure the device settings, select Device settings from the left-hand menu. From here, you can configure the following settings, which are shown in the following screenshot:
- Users may join devices to Azure AD: Here, you can set which users can join their devices to Azure AD. This setting is only applicable to Azure AD join on Windows 10.
- Users may register their devices with Azure AD: This setting needs to be configured to allow devices to be registered with Azure AD. There are two options here: None, that is, devices are not allowed to register when they are not Azure AD joined or hybrid Azure AD joined, and All, that is, all devices are allowed to register. Enrolment with Microsoft Intune or MDM for Office 365 requires registration. If you have configured either of these services, All is selected and None is not available.
- Require Multi-Factor Authentication to register or join devices with Azure AD: Here, you can request that the user is required to perform MFA when registering a device. Before you can enable this setting, MFA needs to be configured for the users who register their devices.
- Maximum number of devices per user: This setting allows you to select the maximum number of devices that a user can have in Azure AD.
- Manage Additional local administrators on all Azure AD joined devices: This setting allows you to add additional local administrators for Azure AD joined devices.
- Manage Enterprise State Roaming settings: This setting provides users with a unified experience across all of their Windows devices and reduces the turnaround time when configuring new devices:

Figure 1.15 – The Azure AD Device settings blade
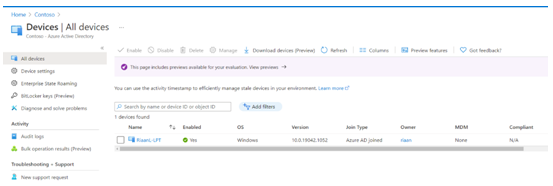
- To locate your devices, under Manage, select All devices. In this overview, you will see all the joined and registered devices, as follows:

Figure 1.16 – The Azure AD All Devices blade displaying all of the devices linked to Azure AD
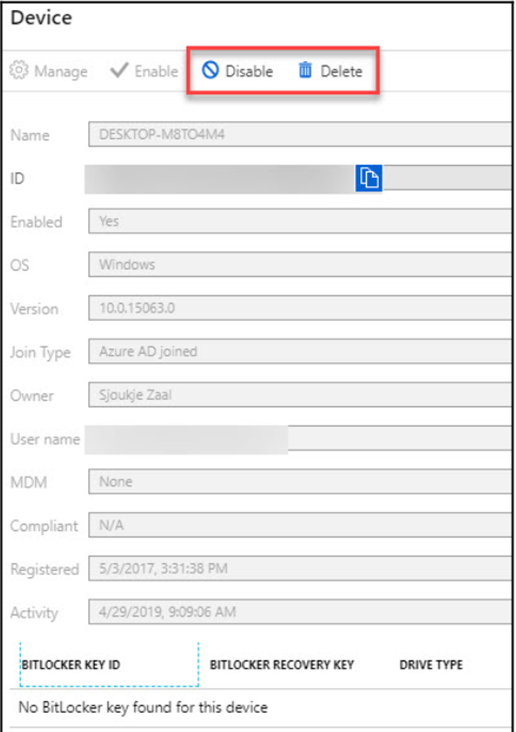
- Additionally, you can select the different devices from the list to get more detailed information about the device. From here, global administrators and cloud device administrators can Disable or Delete the device, as follows:

Figure 1.17 – The Azure AD Device details for a specific device with the option to Disable or Delete the selected device
- To audit logs, under Activity, select Audit logs. From here, you can view and download the different log files. Additionally, you can create filters to search through the logs, as follows:

Figure 1.18 – The Azure AD Device Audit logs blade
This concludes our section on how to manage your device settings via the Azure portal.
We encourage students to read up further by using the following links:
- https://docs.microsoft.com/en-us/azure/active-directory/devices/device-management-azure-portal
- https://docs.microsoft.com/en-us/microsoft-365/business/manage-windows-devices?view=o365-worldwide
Next, we are going to look at how to perform bulk user updates.
